
How to Install & Automate SSL Certificates on Node.js Using ACME
-
Automating SSL/TLS for your Node.js application using an ACME SSL certificate keeps your site secure without manual renewals. This guide uses acme.sh client with External Account Binding (EAB) and shows how to configure a Node.js app with PM2, issue, install, auto-renew, and verify certificates. Example commands use placeholders — replace them with your actual values.
-
-
*
Prerequisites
- ACME SSL subscription with EAB credentials (EAB_KID and EAB_HMAC_KEY)
- Node.js and npm installed (node -v, npm -v to verify)
- A domain name pointing to your server
- A basic Node.js app ready (listening on port 80)
- PM2 installed or ready to install
- Sudo/root access to the server
- Outbound internet access to reach your ACME Server URL (e.g., https://acme.sectigo.com/v2/DV)
-
1
Step 1: Install acme.sh
Install the acme.sh script to handle ACME SSL certificate issuance, installation, and renewal.
- Install acme.sh
curl https://get.acme.sh | sh - Load environment and verify
                                            source ~/.bashrc
                                            acme.sh --version
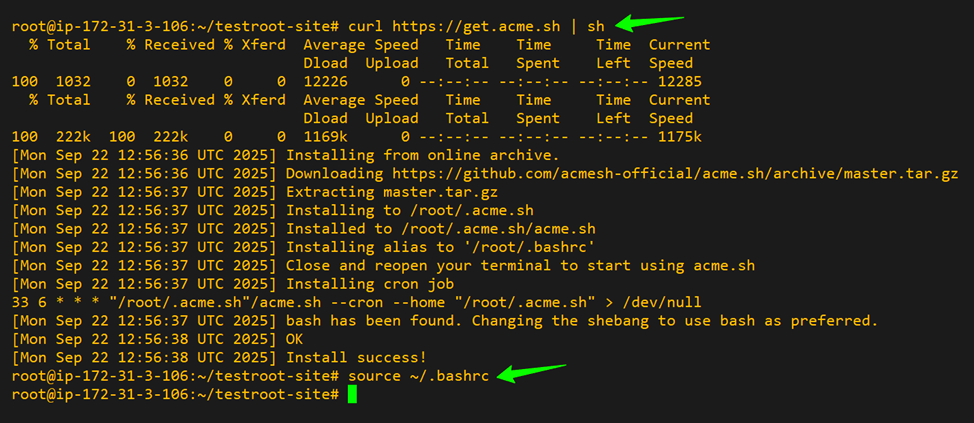 Image Caption: ACME.sh installed successfully.Tip: Ensure curl and git are installed. Use the --force flag if acme.sh is partially installed
 - Install acme.sh
-
2
Step 2: Register ACME Account with EAB
Register your ACME client with your Certificate Authority (CA) using EAB credentials:
                                    acme.sh --register-account \
                                    --server SERVER \
                                    --eab-kid EAB_KID \
                                    --eab-hmac-key EAB_HMAC_KEY \
                                    --accountemail you@example.com
Replace these placeholders with your own values:
- SERVER - The ACME server URL provided by your Certificate Authority.
- EAB_KID - The External Account Binding Key ID provided by your CA.
- EAB_HMAC_KEY - The EAB HMAC Key provided by your CA.
- you@example.com - Your email address for account registration and notifications.
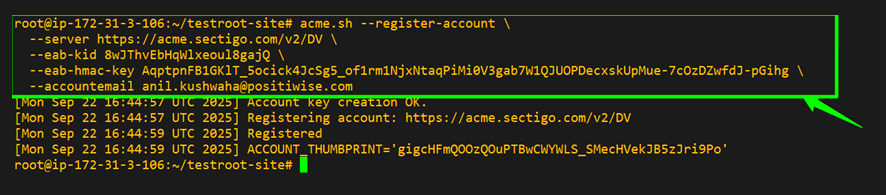 Image Caption: Successfully registering an ACME account with Certificate Authority (CA) using EAB credentials via acme.sh.Tip: If you see “invalid EAB,” double-check the EAB_KID and EAB_HMAC_KEY, and ensure outbound port 443 is open.
 -
3
Step 3 – Keep Node.js App Running with PM2
Follow these sub-steps to ensure your Node.js app runs continuously and restarts automatically on server reboot using PM2.
-
3.1 – Install or Upgrade PM2 Globally
sudo npm install -g pm2 pm2 --version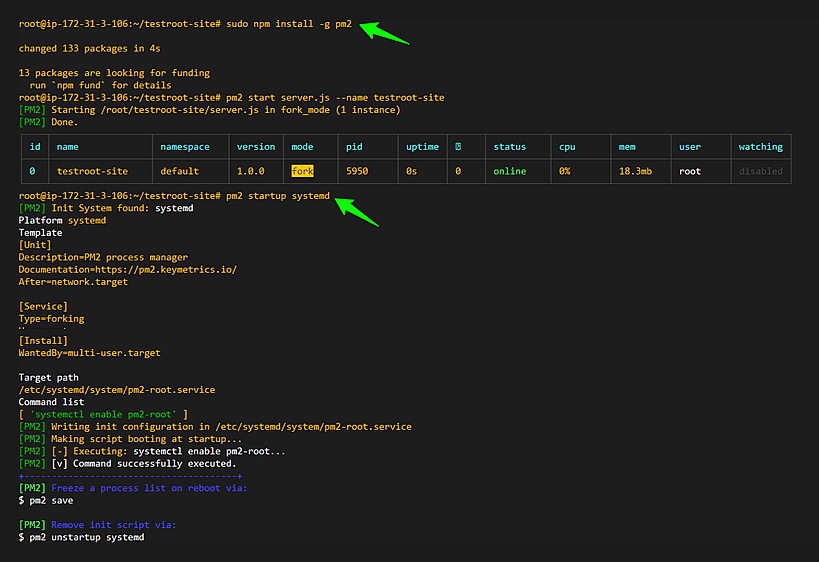 Image Caption: PM2 installed successfully.Tip: Ensure npm is installed and accessible. Use sudo if you encounter permission errors.
 -
3.2 – Start the Node.js app with PM2
pm2 start server.js --name yourapp-site -
3.3 – Enable Auto-Start on System Reboot (PM2)
Run only ONE of the following commands based on how PM2 is running on your server. Root (sudo) access is required.
                                            ### If PM2 is running as root (most cloud servers):
                                             pm2 startup systemd
                                            Or
                                            ### If PM2 is running as a normal user:
                                             sudo env PATH=$PATH:/usr/bin pm2 startup systemd -u <user> --hp /home/<user>

                                            ### Save the current PM2 process list
                                             pm2 save

                                            ### Optional: Remove startup configuration (if reset is needed)
                                             pm2 unstartup systemd
Tip: These commands configure PM2 to automatically restart your Node.js application after a system reboot and ensure the current running processes are permanently saved. 3.4 – Verify PM2 status
pm2 status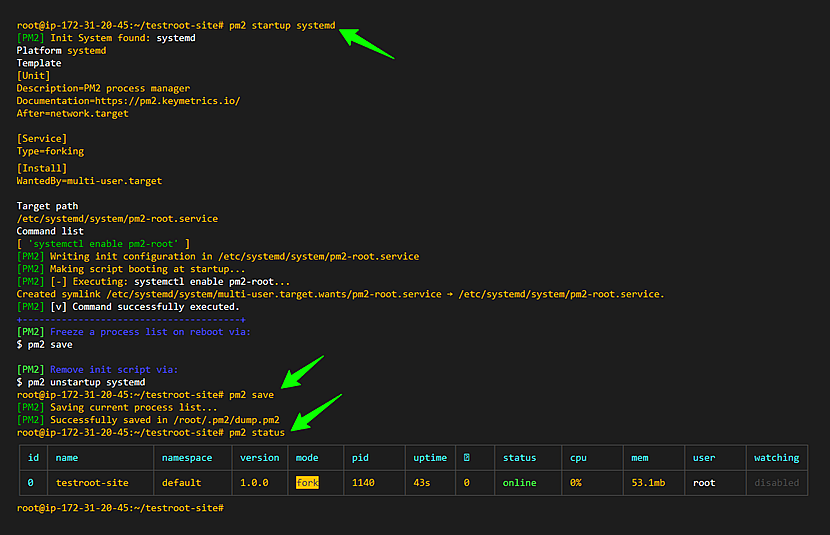 Image Caption: systemd startup service created (pm2-root.service), auto-start enabled via systemctl, process list saved with pm2 save, and application status verified using pm2 status.Tip: Use pm2 logs yourapp-site to check errors.
Confirm the path to server.js is correct.
If pm2 save fails, check folder permissions.
Restart app manually if status shows stopped: pm2 restart yourapp-site
Ensure environment variables are correct and systemd is running.
-
-
4
Step 4 – Issue SSL Certificate (Webroot Mode)
Issue the certificate using the Node.js app’s static folder (webroot):
                                    acme.sh --issue \
                                -d yourdomain.com \
                                -w /path/to/project/public \
                                --server < ACME_SERVER_URL >
Replace these placeholders with your own values:
- yourdomain.com - Your actual domain name.
- /path/to/project/public - The exact folder served by Express via express.static() in Step 6.2. This must match your Node.js static folder to avoid “unauthorized / not delegated” errors.
- SERVER - Your CA’s ACME server URL (e.g., https://acme.sectigo.com/v2/DV).
Tip: The -w option must point to the same directory your Node.js app serves in Step 6.2: app.use(express.static(path.join(__dirname, 'public'))); Mismatched paths are a common cause of certificate issuance errors.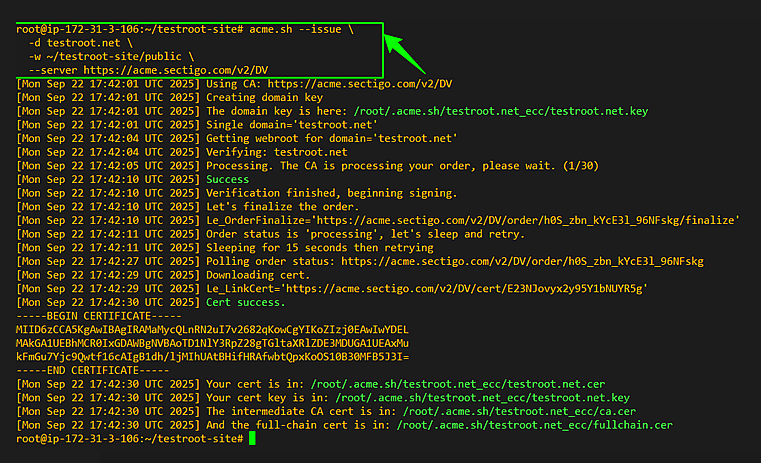 Image Caption: SSL certificate issued successfully.Tip: If “unauthorized / not delegated,” confirm webroot path and EAB registration.
 -
5
Step 5 – Install the Certificate into Node.js
Follow these sub-steps to install the SSL certificate into your Node.js app and configure PM2 for automatic reload:
5.1 – Create a certificate directory
Create a directory to store your SSL certificate and key files:
mkdir -p ~/yourapp-site/certInstall the SSL Certificate using acme.sh
                                            acme.sh --install-cert -d yourdomain.com \
                                              --key-file       /path/to/ssl/yourdomain.key \
                                              --fullchain-file /path/to/ssl/yourdomain.crt \
                                              --reloadcmd      "pm2 restart yourapp-site"
Replace these placeholders with your own values:
- /path/to/ssl/ - Directory where the certificate and key files will reside
- yourdomain.com - Your actual domain name
- pm2 restart yourapp-site - Reloads your Node.js app automatically.
-
5.3 - Set secure permission for SSL files
Set ownership and permissions to protect your private key and certificate files. By default, private keys are restricted to root for security, ensuring HTTPS works correctly if your Node.js/PM2 process runs as root.
sudo chown root:root /path/to/ssl/*sudo chmod 600 /path/to/ssl/yourdomain.key sudo chmod 644 /path/to/ssl/yourdomain.crtNote for Non-Root Deployment:: If your Node.js/PM2 process runs under a non-root user, you must adjust ownership and permissions so the process can read the private key:
sudo chown <user>:<group> /path/to/ssl/yourdomain.key
sudo chmod 600 /path/to/ssl/yourdomain.key
Replace <user> and <group> with the username and group under which your Node.js process runs. The certificate file (.crt) can remain world-readable (chmod 644).
This ensures HTTPS works correctly without running your application as root, maintaining security best practices. 5.4 - Verify automatic reload
After each renewal, acme.sh will reuse these paths and reload your Node.js app via PM2 automatically.
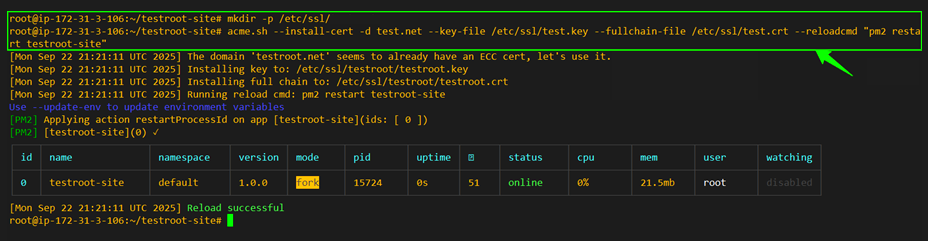 Image Caption: Terminal output confirming successful installation of the SSL certificate into /path.to/ssl/ and automatic reload via PM2.Tip: Confirm the --reloadcmd path is correct. Check ownership and permissions of yourdomain.key and yourdomain.crt.
-
6
Step 6 – Enable HTTPS in Node.js
To enable HTTPS, you’ll need to update your Node.js server.js file. Follow these sub-steps in order:
6.1 – Import required modules
Add the following require statements to the top of server.js:
                                            const express = require('express');
                                       const fs = require('fs');
                                        const https = require('https');
                                        const http = require('http');
                                        const path = require('path');
6.2 – Initialize Express and static file handling
                                            const app = express();
                                            // Serve static files (public folder)
                                    app.use(express.static(path.join(__dirname, 'public')));

                                     // Serve ACME challenge files explicitly (for certificate renewal)
                                    app.use(
                                    '/.well-known/acme-challenge',
                                    express.static(path.join(__dirname, 'public', '.well-known', 'acme-challenge'), { dotfiles: 'allow' })
                                    );
6.3 – Add root response route
                                           app.get('/', (req, res) => {
                                    res.send('<h1>Hello from yourdomain.com (HTTPS enabled)</h1>');
                                    });
6.4 – Redirect HTTP (80) traffic to HTTPS
                                           http.createServer((req, res) => {
                                    res.writeHead(301, { Location: 'https://' + req.headers.host + req.url });
                                    res.end();
                                    }).listen(80, () => {
                                    console.log('HTTP server running on port 80 (redirecting to HTTPS)');
                                    });
6.5 – Start HTTPS server with your SSL certificate
                                           https
                                    .createServer(
                                    {
                                    key: fs.readFileSync('/path/to/ssl/yourdomain.key'),
                                    cert: fs.readFileSync('/path/to/ssl/yourdomain.crt')
                                    },
                                    app
                                    )
                                    .listen(443, () => {
                                    console.log('Server running securely on https://yourdomain.com');
                                    });
Replace these placeholders with your own values:
- yourdomain.com - Replace with your actual domain name.
- /path/to/ssl/ - Directory where your certificate and key files are stored.
- yourdomain.key - Your private key file generated during installation.
- yourdomain.crt - The full certificate chain file issued by ACME.
After updating server.js, restart your Node.js application:# Standard restart (use this normally) pm2 restart yourapp-site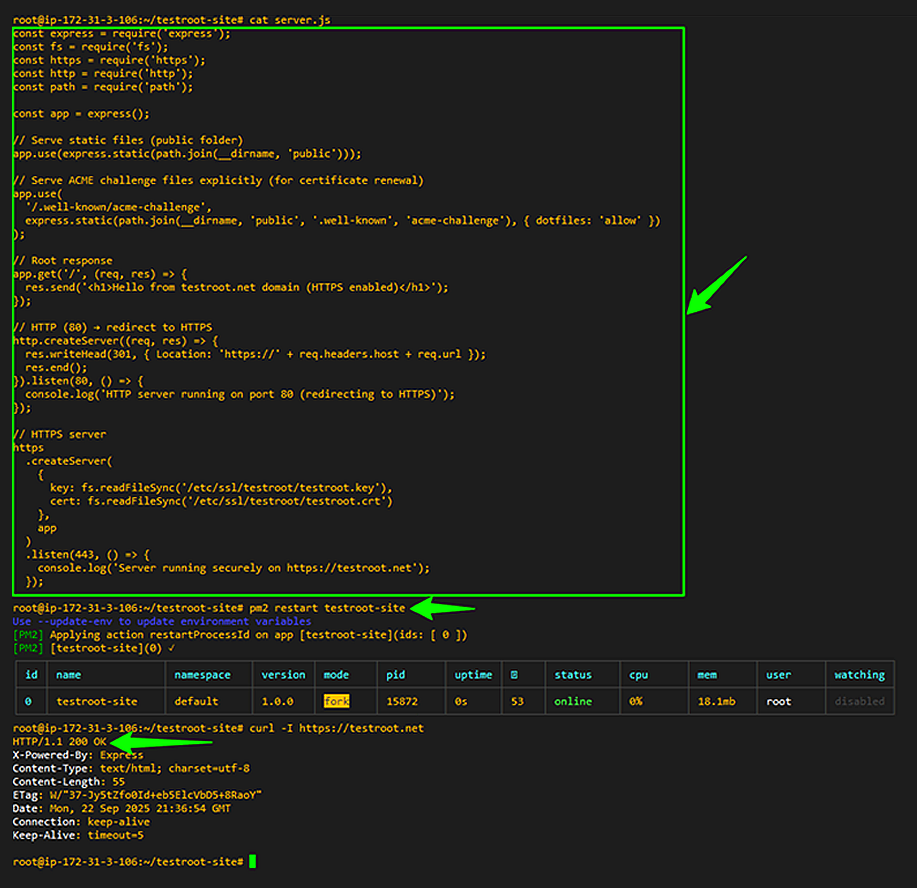 Image Caption: Demonstrating the issue-HTTP remains active with status 200 OK because PM2 restart didn’t clear previous processes; redirect to HTTPS failed.
Required when switching from HTTP → HTTPS (prevents port conflicts). If your previous server.js used HTTP on port 80 and you replaced it with HTTPS configuration, PM2 may still hold the old process in memory.To avoid stale HTTP bindings and ensure HTTPS loads correctly, run:
                                            pm2 stop all
                                        pm2 delete all
                                                pkill node

                                        # Start fresh with HTTPS
                                        pm2 start server.js --name yourapp-site
                                        pm2 save
Note: This clears old PM2 processes that were still bound to port 80 and ensures the new HTTPS configuration loads correctly.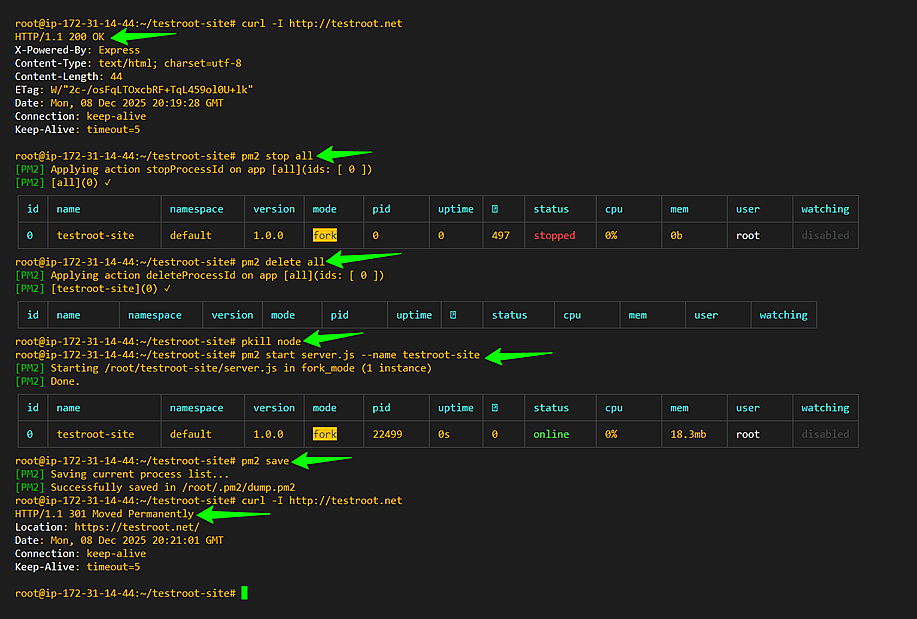 Image Caption: DCleaning old PM2 processes (stop/delete) and restarting server.js to fix HTTP→HTTPS port binding conflicts
Note for Non-Root Deployment. Port 443 typically requires root privileges. If your Node.js/PM2 process runs as a non-root user, you have two options:1. Run the server on a higher port (e.g., 8443) and use a reverse proxy (like NGINX) to forward HTTPS traffic.
2. Use `setcap` to allow Node.js to bind to port 443.
Additionally, ensure the SSL key file is readable by the non-root process:
sudo chown <user>:<group> /path/to/ssl/yourdomain.key
sudo chmod 600 /path/to/ssl/yourdomain.key
The certificate file (.crt) can remain world-readable (chmod 644).
This ensures HTTPS works correctly without running your application as root, maintaining security best practices.Tips: Fix cert/key path if HTTPS fails (use your /path/to/ssl/yourdomain.key and .crt).
Check pm2 logs <your-app-name> if process stops.
Allow port 443 in firewall.
Serving /.well-known/acme-challenge ensures future renewals succeed.
-
7
Step 7 – Verify Installation & Auto-Renewal
-
7.1 - Verify the SSL Installation
Visit https://yourdomain.com and confirm:
Site loads over HTTPS
Certificate is valid and matches your domain -
7.2 - Check cron job created by acme.sh:
crontab -l -
7.3 - Force a manual renewal test
acme.sh --renew -d yourdomain.com --force - yourdomain.com - Replace with the domain you will use for the SSL certificate.
Replace these placeholders with your own values:
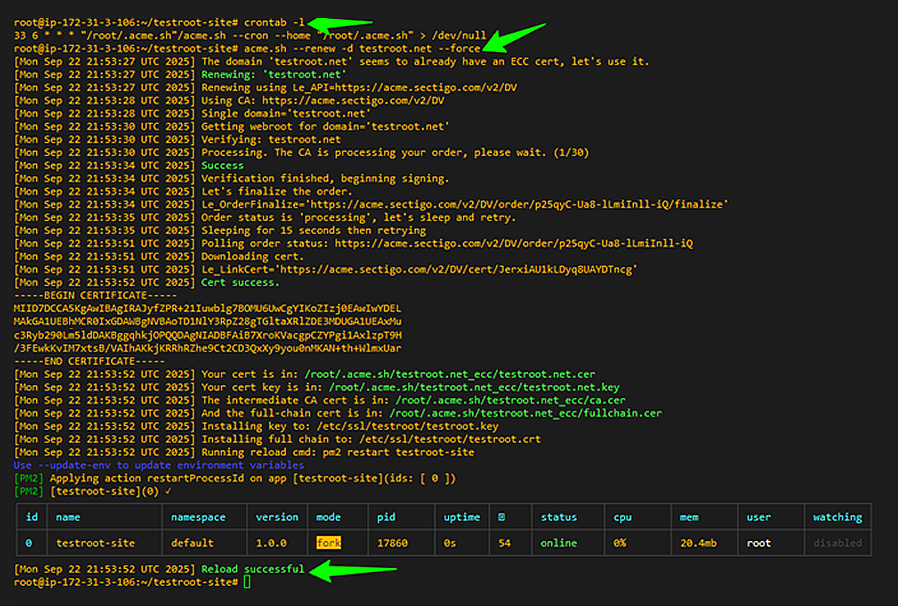 Image Caption: Renewal test showing reload executed.
 -
-
Optional Checks & Troubleshooting
-
These steps are not required for most installations but are helpful if you encounter issues. You may also contact our support team for more questions.
-
-
*
Verify ACME HTTP-01 challenge setup
Create the .well-known/acme-challenge directory and confirm that the test file is accessible:
                                    mkdir -p ~/yourapp-site/public/.well-known/acme-challenge
                                echo "Welcome test" > ~/yourapp-site/public/.well-known/acme-challenge/testfile
                                        curl http://yourdomain.com/.well-known/acme-challenge/testfile
Replace these placeholders with your own values:
- yourdomain.com - Replace with your actual domain name
- ~/yourapp-site - Path to your Node.js app directory
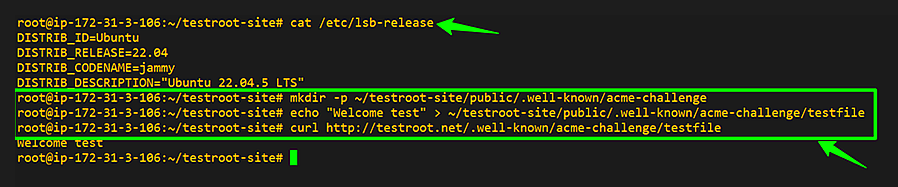 Image Caption: Verifying ACME HTTP-01 challenge setup on Node.js by creating a test file in .well-known/acme-challenge and successfully retrieving it via curl.Tip: Ensure permissions allow web access. If forced HTTP→HTTPS redirects exist, add an exception for ACME path.
 -
*
Troubleshooting
- Unauthorized → confirm EAB and ACME server URL in Step 3.
- Port 80 blocked → check conflicts (sudo lsof -i:80).
- Standalone conflicts → always use -w webroot mode with Node.js running.
-
*
Summary
You have successfully::
- Configured Node.js for ACME HTTP-01.
- Registered an account with EAB.
- Started Node.js app with PM2.
- Issued and installed SSL.
- Enabled auto-renewal via PM2 reload.
- Verified installation.
SSL renewals now run automatically without manual intervention.
-