

How to Install & Auto-Renew SSL Certificates on Apache (Windows) Using ACME with EAB
-
Automating SSL/TLS for your Apache web server on Windows using an ACME SSL certificate keeps your website secure without manual renewals. This guide, using the Win-ACME (WACS) client with external account binding (EAB), shows how to:
- configure Apache, and
- issue and install your certificate(s),
- set up auto-renewals, and
- verify and troubleshoot certificates.
Example commands use placeholders — replace them with your actual values.
-
-
*
Prerequisites
Before getting started, ensure you have the following assets in place or processes completed:
- An ACME SSL subscription with EAB credentials (i.e., the external account binding key identifier [EAB_KID] and external account binding HMAC key [EAB_HMAC_KEY]) from your chosen certificate authority (CA)*
- Outbound internet access to your CA’s ACME Server URL
- Apache installed on your Windows device (standalone Apache is recommended: C:\Apache24\)
- A domain name pointing to your Windows server
- Apache webroot accessible at C:\Apache24\htdocs
- Administrator access to Windows Command Prompt
- Port 80 and 443 are set as open in Windows Firewall and your router
* These credentials are issued by your chosen ACME certificate authority (CA), and the exact process of accessing them varies by CA.
-
1
Step 1: Install the Win-ACME Client
- Download the latest Win-ACME ZIP package (found on the Download page of the official WIN-ACME website).
- Extract the ZIP file to the directory C:\win-acme.
- Next, open Command Prompt as Administrator. Verify its successful installation using the following command:
                                    cd C:\win-acme
                                    wacs.exe
The result should be an output listing the Windows ACMEv2 client (WACS) client (i.e., wacs.exe), much like the example image below: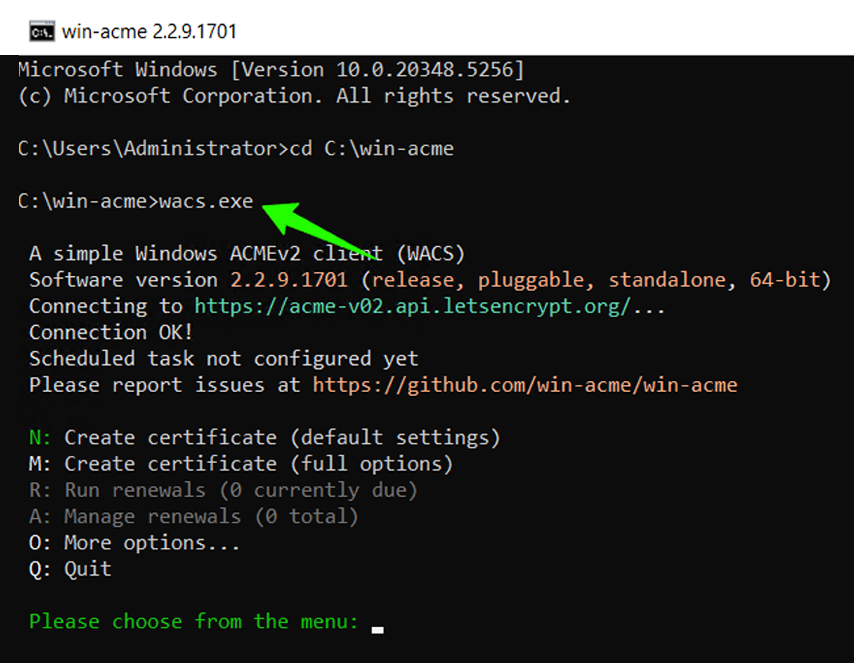 Image Caption: This screenshot shows that Win-ACME installed successfully on a Windows server.Tips:
- Always run Command Prompt as Administrator.
- Ensure Apache is running before issuing the certificate.
- Confirm your domain loads successfully.
-
2
Step 2: Create the SSL Certificate Directory
- Create a dedicated SSL folder for certificate files:
mkdir C:\Apache24\conf\ssl - Verify the directory exists:
dir C:\Apache24\conf\ssl
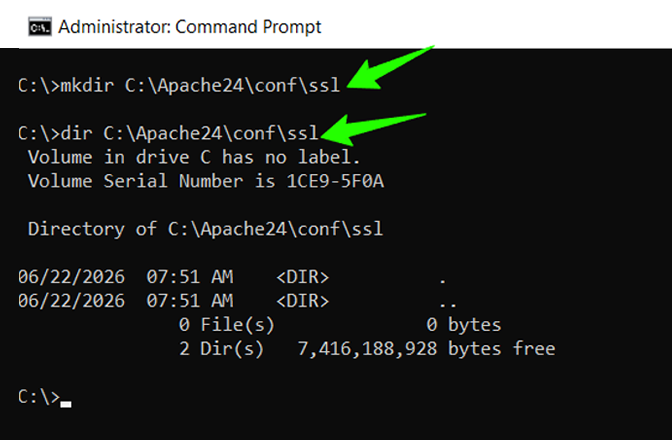 Image Caption: An example screenshot showing that the SSL certificate directory has been created successfully.Tips: Keep SSL files outside the public webroot for better security.
 - Create a dedicated SSL folder for certificate files:
-
3
Step 3: Connect to the CA’s ACME Server
To start, run the following set of commands to select your directory and to register and connect your Win-ACME client with your certificate authority (CA):
                                    cd C:\win-acme
                                    wacs.exe --baseuri ACME_SERVER_URL
Note: Replace the placeholder ACME_SERVER_URL value in the second command listed above with your own CA’s public ACME server URL. For example:- DigiCert: https://one.digicert.com/mpki/api/v2/acme/v2/directory
- Sectigo: https://acme.sectigo.com/v2/DV
Follow the menu steps outlined below. These steps must be followed precisely to work properly.
-
Select the Domain Input Method
Open the menu and make the following selections:
- Select M and hit Enter to create a certificate for your domain with full options.
- Choose option 2 (Manual input) and hit Enter to specify how the list of included domains will be determined.
- Input your domain name (e.g., yourdomain.com). Review the provided default friendly name and press Enter to continue.
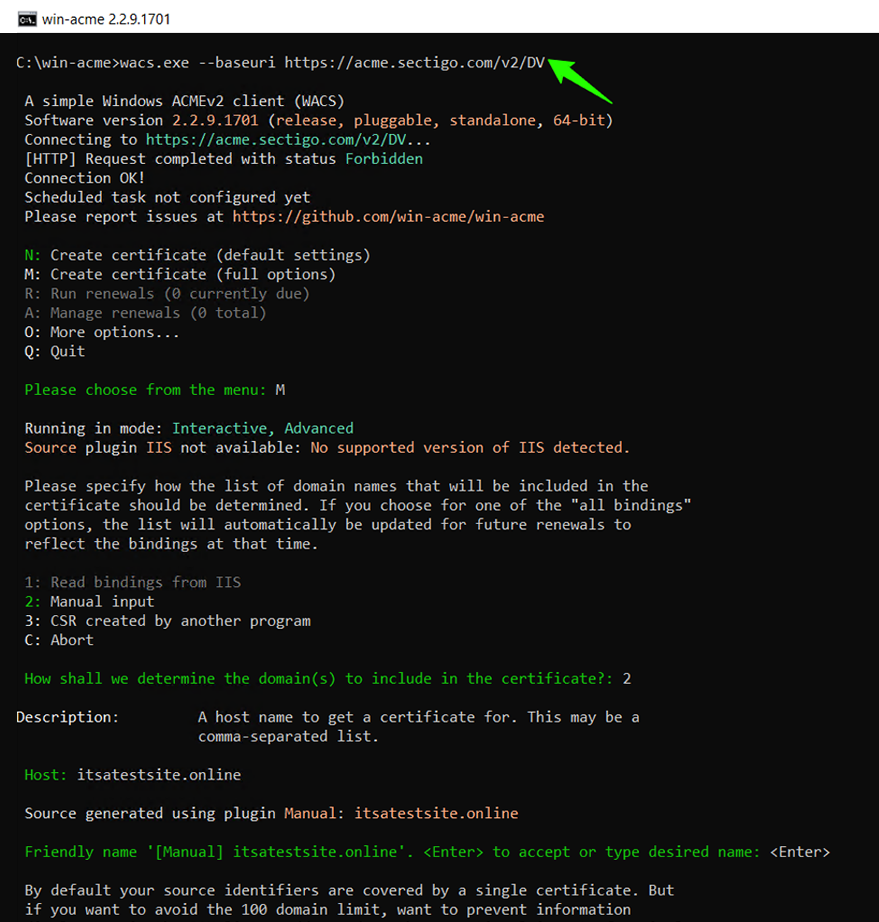 Image Caption: Selecting the domain validation method and configuring the Apache webroot path for ACME HTTP-01 validation.
 -
Choose the Certificate Type
Type 4 to select the single certificate option and hit Enter.
-
Choose Your Preferred Domain Ownership Validation Method
When prompted, select your preferred domain control validation (DCV) method. For this example, we’ll be using the HTTP validation via Webroot:
- Hit 1 and submit your selection of HTTP validation.
- Set the Webroot path to C:\Apache24\htdocs and hit Enter again.
- When prompted about web.config, press N (since we’re using Apache and not Windows Server IIS Manager) and hit Enter to submit your selection.
Tips: Ensure your domain resolves to the correct server IP address and that Apache can serve files from the specified webroot directory.
-
4
Step 4: Configure Certificate Storage Settings
Select the Private Key Type
Choose option 2: RSA key for your private key.
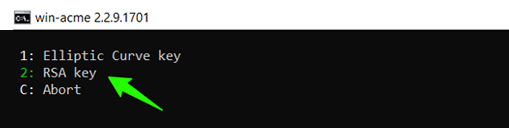 Image Caption: This example shows how to specify your preferred key type.
Specify Your Certificate File and Storage Settings- Select 2: PEM encoded files to store your certificate using the .pem file format.
- Press 2 again and specify the file path where you’ll save the certificate as C:\Apache24\conf\ssl.
- Choose the following numbers to set the corresponding configurations:
- 1 (No password)
- 5 (No additional store)
- 3 (No additional installation steps)
Tips: Using PEM format is recommended for Apache because it allows the certificate chain and private key to be referenced directly within Apache SSL configuration files. -
5
Step 5: Register with EAB and Issue the Certificate
Accept the ACME Server’s Terms of Service and Enter EAB Credentials
- Hit Y to open the terms of service PDF on your screen or N to decline.
- Press Y to agree to the terms of service.
- When prompted, enter the following string values (provided by your CA) to register your account:
- External account binding key identifier (EAB_KID)
- External account binding HMAC key (EAB_HMAC_KEY)
After successful validation and account registration, Win-ACME will issue the certificate for you to download.
Configure Automatic Renewal Task
Select N to choose the default SYSTEM user. You should see a resulting output that looks akin to the following (although it will list your relevant details instead of the placeholder data):
                                    [yourdomain.com] Authorization result: valid
                                    Downloading certificate [Manual] yourdomain.com
                                    Exporting .pem files to C:\Apache24\conf\ssl
                                    Adding Task Scheduler entry
If Win-ACME returns to a new certificate menu after completion, then exit by typing C or Q. (This exit method is safe because the certificate has already been issued.)
Verify the generated files are accounted for and accurate:
dir C:\Apache24\conf\sslHere is an example list of the files you should expect to see (although yours will have your unique domain details instead of the placeholder yourdomain.com listed):
yourdomain.com-chain-only.pem yourdomain.com-chain.pem yourdomain.com-crt.pem yourdomain.com-key.pem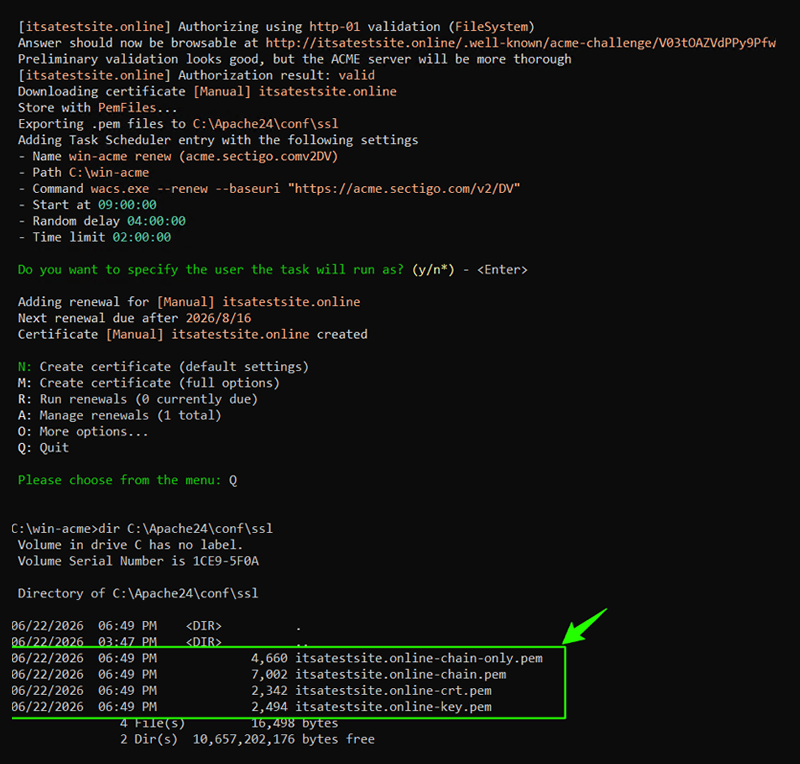 Image Caption: Successfully issuing and exporting an SSL certificate using Win-ACME and your EAB credentials.Tips: If validation fails, confirm that the DNS points to your server, Apache is running on port 80, and the ACME challenge file is publicly accessible.
 -
6
Step 6: Enable the SSL Modules in Apache
Follow the sub-steps below to enable HTTPS support in Apache.
Open Apache Configuration
In CMD, enter the following command to access your Apache configuration file using the Notepad text editor:
notepad C:\Apache24\conf\httpd.confEnsure the following lines are enabled (remove the # symbol if commented):
LoadModule ssl_module modules/mod_ssl.so LoadModule socache_shmcb_module modules/mod_socache_shmcb.so Include conf/extra/httpd-ssl.conf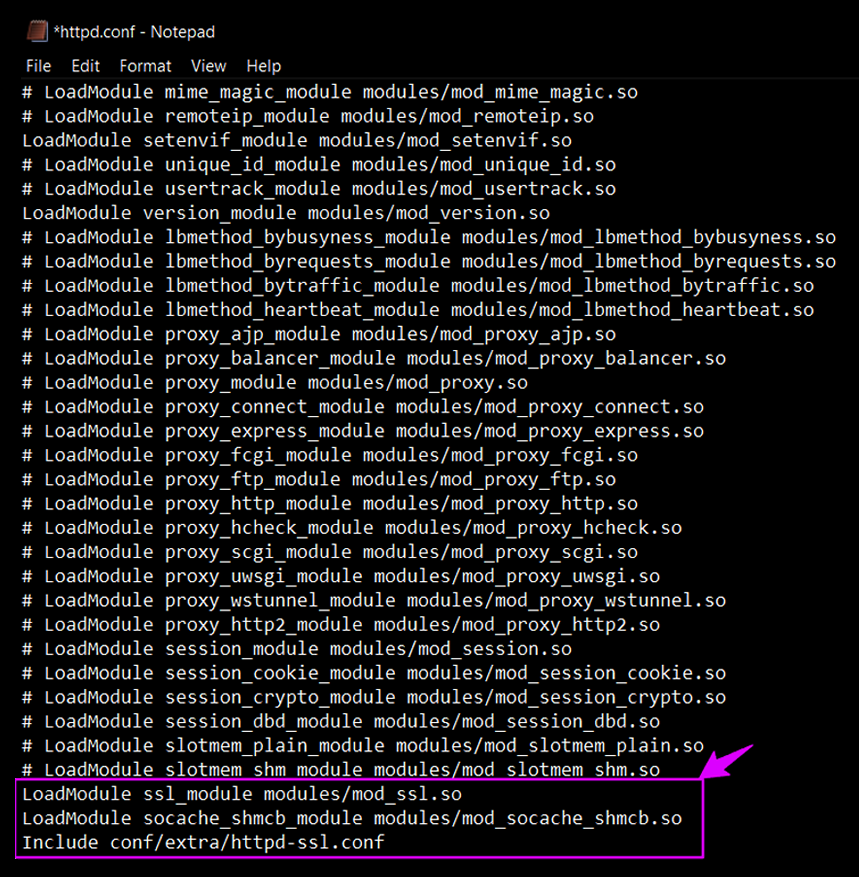 Image Caption: An example of what you’ll see when Apache SSL modules have been enabled successfully.Tips:
Save the file before restarting Apache.
Don’t duplicate SSL module entries.Configure Apache HTTPS VirtualHost
Open your Windows server’s Apache config file using the Notepad editor:
notepad C:\Apache24\conf\extra\httpd-ssl.confUpdate the following values (using your specific details in place of the example placeholder data):
                                    ServerName yourdomain.com:443
                                DocumentRoot "C:/Apache24/htdocs"
                                    ServerAdmin user@yourdomain.com
                                SSLCertificateFile "C:/Apache24/conf/ssl/yourdomain.com-chain.pem"
                                SSLCertificateKeyFile "C:/Apache24/conf/ssl/yourdomain.com-key.pem"
Tips: Always use forward slashes (/) in Apache SSL paths, even on Windows.If present, comment this line:
#SSLCertificateChainFileNext, replace these placeholders with your own values:
- yourdomain.com - Replace with your unique domain name
- C:/Apache24/conf/ssl/ - This is the directory where your certificate files are stored
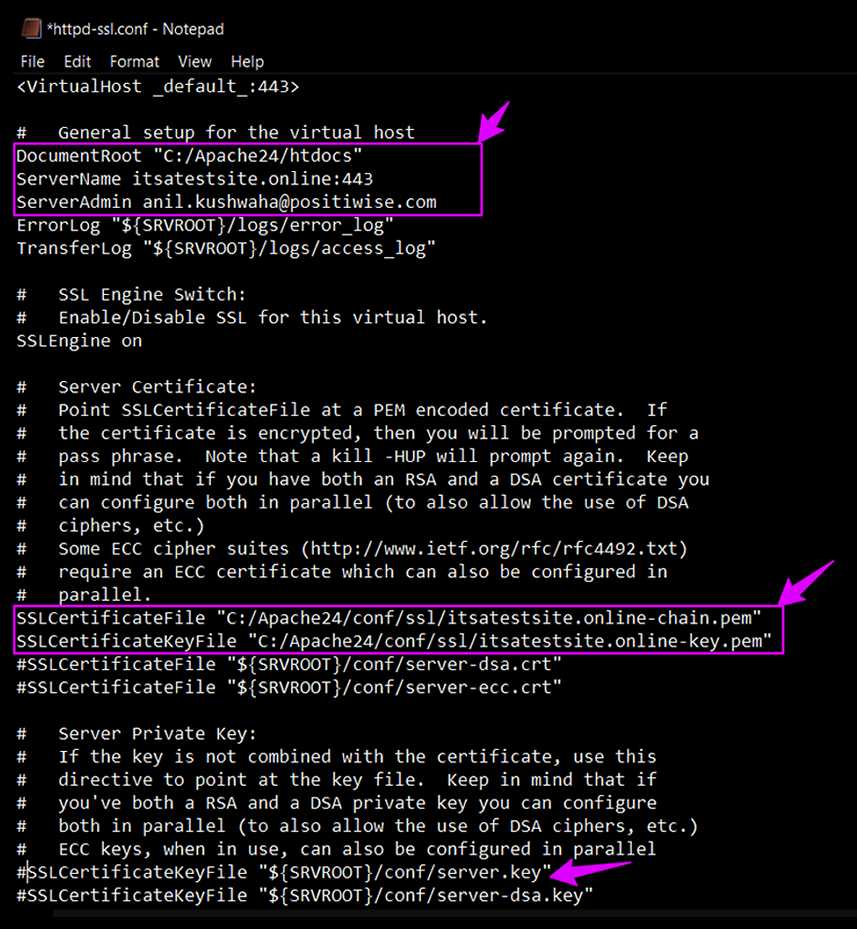 Image Caption: A demonstration showing how to update the Apache SSL VirtualHost configuration (httpd-ssl.conf) settings with ServerName, SSL certificate and key path details.
 -
8
Step 8: Finalize Your Apache & HTTPS Configurations
Follow these sub-steps to apply the SSL certificate to Apache and enable HTTPS.
Verify the Apache Configuration Syntax Is Correctly Set
                                  cd C:\Apache24\bin
                                    httpd -t
This is what you should see as the expected output:
Syntax OKRestart Apache
Enter the following command to reboot Apache:
httpd -k restartSet Up the HTTP → HTTPS Redirect
Open the httpd.conf file:
notepad C:\Apache24\conf\httpd.confAdd the following input at the bottom (using your pertinent details in place of the placeholder values):
<VirtualHost *:80> ServerName yourdomain.com Redirect permanent / https://yourdomain.com/ </VirtualHost>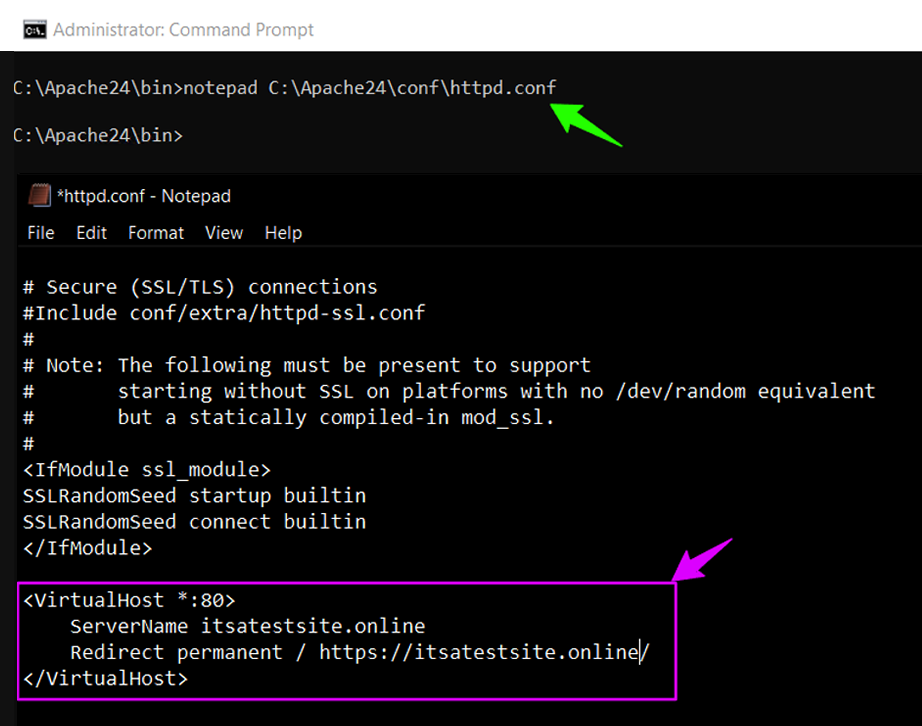 Image Caption: An example showing what you’ll see when Apache successfully serves up HTTPS using an ACME SSL certificate.
Restart Apache again:
httpd -k restartIf the redirect was successful, you should see the following:
- Site loads securely over HTTPS
- Browser lock icon appears
- Certificate matches your domain
Tips: If HTTPS fails, verify the SSL file paths are correct in httpd-ssl.conf and try again.Option #1: Schedule a Regular SSL/TLS Certificate Renewal
(Note: This is typically done during the renewal window (~30 days before the certificate’s expiration date)
To manually implement a certificate renewal, enter the following commands:
                                cd C:\win-acme
                                wacs.exe --renew --baseuri “YOUR_ACME_SERVER_URL”
The expected output will look like this:
Renewal yourdomain.com is due after YYYY/MM/DDOption #2: Renew Your Certificate Immediately.
This approach bypasses the expiration check process and renews the certificate instantly:
                                    cd C:\win-acme
                                    wacs.exe --renew --force --baseuri "YOUR_ACME_SERVER_URL"
The expected output will look like this:
Renewal for yourdomain.com succeeded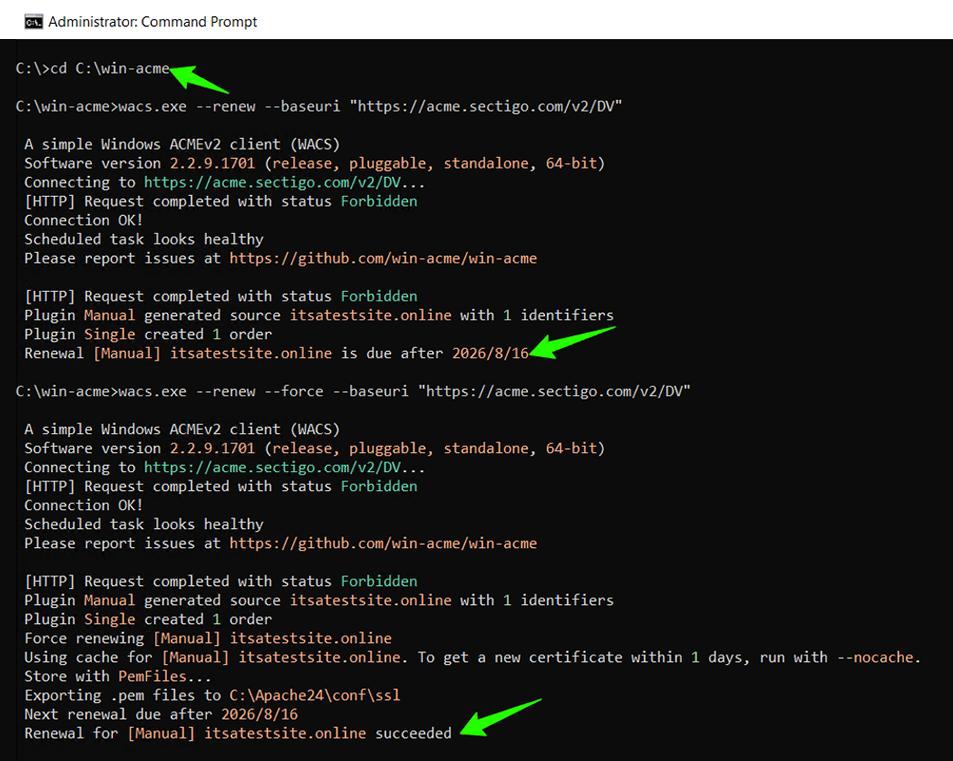 Image Caption: A demonstration of certificate renewal tests confirming automatic SSL renewal is configured successfully.Notes:
- The message Scheduled task looks healthy means that the specified auto-renewal function is configured properly.
- Some certificate authorities may show temporary HTTP warnings during connection checks.
-
Final Optional Checks & Troubleshooting
-
These steps are not required for most installations but are helpful if you encounter issues. You may also contact our support team for more questions.
-
-
*
Verify the HTTP Validation Setup
Create a test file (e.g., testfile.txt) on your web server using the following command:
echo Welcome test > C:\Apache24\htdocs\testfile.txtConfirm the file exists on your domain by opening the verification test file in your browser. (Replace the placeholder yourdomain.com with your domain name.):
curl -I http://yourdomain.com/testfile.txt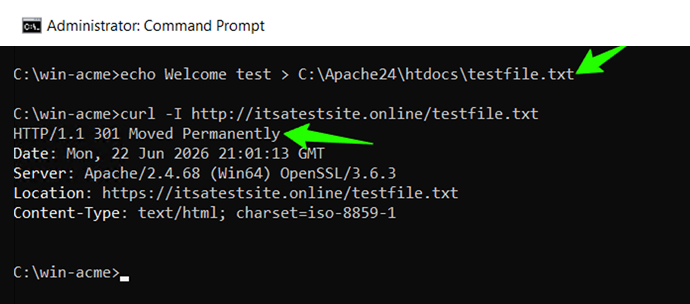 Image Caption: Verify Apache HTTP accessibility before setting up the certificate renewal.Notes:
- Ensure Apache is running.
- Confirm your DNS points to the correct server.
- Keep port 80 accessible.
-
*
Troubleshooting
We’ve put together a list of error codes and solutions:
- Validation failed - Confirm Apache is running and verify the DNS points to your server
- HTTPS not loading - Verify the SSL paths listed in httpd-ssl.conf
- Redirect not working - Add the VirtualHost redirect in httpd.conf
- Apache syntax errors - Run: httpd -t
- Renewal issues - Run: wacs.exe --renew --baseuri “YOUR_ACME_SERVER_URL”
-
*
Final Recap
Congratulations! You have successfully achieved the following
- Configured Apache for ACME HTTP-01 validation
- Registered an account using the EAB credentials
- Installed your issued SSL/TLS certificate
- Enabled HTTPS on Apache
- Configured the HTTP → HTTPS redirect
- Enabled automatic renewal using Win-ACME
- Verified the installation process has completed successfully
Now, SSL renewals will run automatically without requiring manual intervention.
-