

How to Install & Automate SSL Certificates on Kubernetes Using AWS ALB, ACM, and ACME (EAB)
-
Automating SSL/TLS certificates on Kubernetes eliminates manual renewals and prevents downtime caused by certificate expirations. This guide demonstrates how to:
- issue SSL certificates using an ACME-compatible certificate authority (e.g., DigiCert or Sectigo),
- automate DNS validation via Amazon Web Services (AWS) Route 53,
- import certificates into AWS Certificate Manager (ACM),
- attach certificates to Amazon Web Services Load Balancer Controller (formerly known as AWS Application Load Balancer (ALB) Ingress Controller), enable fully automatic renewal (zero manual work) using ACME external account binding (EAB).
-
-
*
Architecture Overview
ACME
(CA that issues the certificate via the ACME protocol) AWS Secrets Manager
(securely stores the EAB HMAC key) Acme.sh
(for EC2 instances running 24/7) Route 53 DNS Validation
(automated verification of domain ownership) AWS Certificate Manager (ACM)
(which imports and stores the SSL/TLS certificate) AWS Load Balancer Controller
(this handles traffic to the cluster).Placeholder Table (For Reference)
Placeholder Description <DOMAIN_NAME> Fully qualified domain name (e.g., example.com) <ACCOUNT_EMAIL> Email used for ACME account registration <ACME_SERVER_URL> ACME server directory URL (e.g., Sectigo/DigiCert) <EAB_KEY_ID> External Account Binding Key Identifier (issued by the CA) <EAB_HMAC_KEY> External Account Binding HMAC Key (issued by the CA and securely stored in AWS Secrets Manager before being assigned to the $EAB_HMAC_KEY environment variable) <AWS_REGION> AWS region (e.g., ap-south-1) <ACM_CERT_ARN> ACM certificate Amazon Resource Name (ARN) is generated after first import <CERT_DIR> Path where acme.sh stores certificates <INGRESS_NAME> Kubernetes Ingress resource name <SERVICE_NAME> Backend Kubernetes Service name <SERVICE_PORT> Backend service port (e.g., 80) <EAB_SECRET_NAME> AWS Secrets Manager secret name containing the EAB HMAC key -
*
Prerequisites
- Kubernetes cluster (EKS recommended)
- AWS Load Balancer Controller is installed and verified (HTTP traffic confirmed)
- Domain is configured in Route 53 (<DOMAIN_NAME>)
- EC2 instance (Linux/Ubuntu) — must always be set to ON
- AWS Command Line Interface (AWS CLI) is installed and authenticated
- An IAM role (recommended) or IAM user with permissions to access:
- Amazon Route 53
- AWS Certificate Manager (ACM)
- AWS Secrets Manager
- The EAB HMAC key has been securely stored in AWS Secrets Manager.
-
1
Step 1: Set Up IAM Permissions (Required)
Navigate to the following:
IAM → Users → Permissions → Add Inline Policy
Use this JSON:{ "Version": "2012-10-17", "Statement": [ { "Sid": "Route53Access", "Effect": "Allow", "Action": "route53:*", "Resource": "*" }, { "Sid": "ACMImportAccess", "Effect": "Allow", "Action": "acm:ImportCertificate", "Resource": "*" } ] }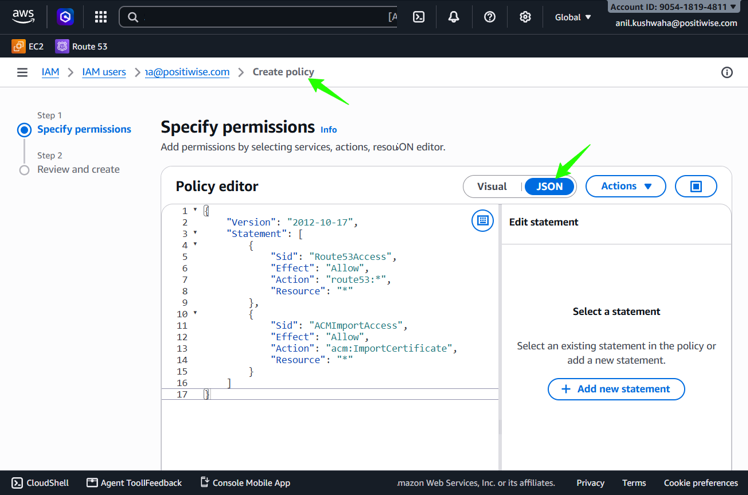 Image Caption: IAM inline policy configured with Route53 and ACM import permissions.
⚠ Important: For production deployments on Amazon EC2, AWS recommends attaching an IAM role to the EC2 instance instead of creating long-term AWS access keys. If your EC2 instance uses an IAM role, you can skip the access key creation step below.
Optional: Set Up IAM User Authentication Only
If you are authenticating with an IAM user instead of an IAM role, create an access key by navigating to the access key: IAM → Users → Security Credentials → Create Access Key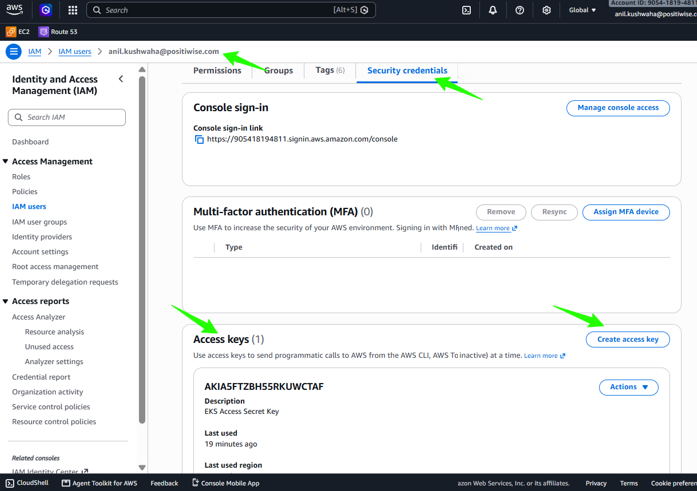 Image Caption: A demonstration of an access key and secret access key created for AWS configuration.Notes:
- AWS recommends using an attached IAM role for Amazon EC2 production deployments instead of long-term AWS access keys.
- If your EC2 instance uses an attached IAM role, you can skip the access key creation step.
- Create an access key only if you’re authenticating with an IAM user instead of an IAM role.
-
2
Step 2: Install Acme.sh (on EC2)
Use the following command to install the ACME client:
curl https://get.acme.sh | sh source ~/.bashrc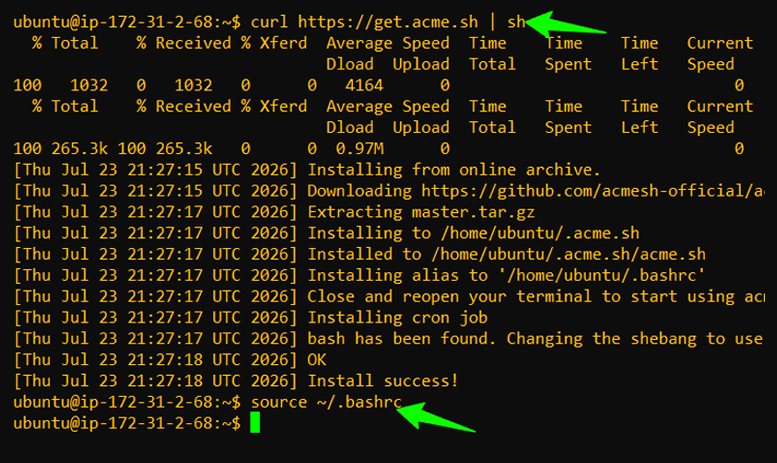 Image Caption: acme.sh installed successfully on EC2 instance.Notes: Must run on a 24/7 available system (EC2 recommended)Troubleshooting Tips:
- Command not found → run source ~/.bashrc
- Ensure installation path is added to $PATH
-
3
Step 3: Configure AWS Authentication
For Amazon EC2 instances, AWS recommends using an IAM role attached to the instance instead of storing long-lived AWS access keys as environment variables. The AWS CLI automatically retrieves temporary credentials from the attached IAM role, providing a more secure authentication method for production environments.
If you’re running this workflow outside Amazon EC2, configure AWS CLI using your preferred AWS authentication method before continuing:
aws sts get-caller-identityExpected output:
{ "UserId": "AROAXXXXXXXXXXXXX:botocore-session", "Account": "123456789012", "Arn": "arn:aws:sts::123456789012:assumed-role/EC2-ACME-Role/i-0123456789abcdef0" }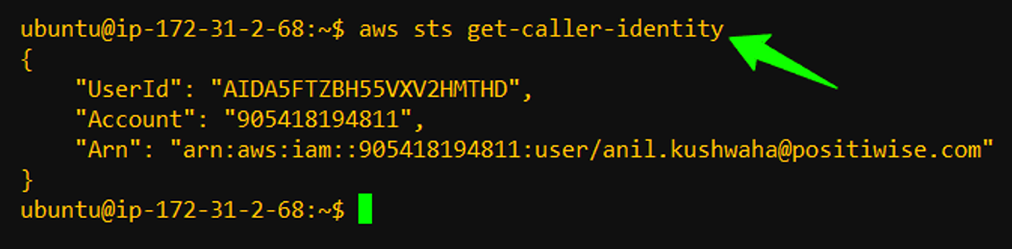 Image Caption: Verify AWS CLI authentication using the attached IAM role.Notes:
- AWS CLI must be authenticated before continuing.
- For Amazon EC2 instances, AWS recommends using an attached IAM role instead of long-term AWS access keys.
- When an IAM role is attached, AWS CLI automatically retrieves temporary credentials from the EC2 Instance Metadata Service (IMDS), eliminating the need to store AWS access keys on the instance.
- If you are using an IAM user instead of an IAM role, configure the AWS CLI using your preferred authentication method before continuing.
- The IAM role (recommended) or IAM user must have permissions to access Amazon Route 53, AWS Certificate Manager (ACM), and AWS Secrets Manager.
Step 3.1: Retrieve the EAB HMAC Key Info from AWS Secrets Manager
Before registering the ACME account, export the EAB HMAC key securely from AWS Secrets Manager using the following command:
export EAB_HMAC_KEY=$(aws secretsmanager get-secret-value \ --secret-id "<EAB_SECRET_NAME>" \ --query SecretString \ --output text \ --region "<AWS_REGION>") Image Caption: Retrieve the EAB HMAC key securely from AWS Secrets Manager.
Expected Output:
The EAB_HMAC_KEY environment variable is populated with the secret value retrieved from AWS Secrets Manager.Notes:- Replace <EAB_SECRET_NAME> with the name of your AWS Secrets Manager secret.
- Ensure the IAM role (recommended) or IAM user has permission to retrieve secrets from AWS Secrets Manager.
Troubleshooting:- AccessDeniedException → Verify whether the IAM role (recommended) or IAM user has the required AWS Secrets Manager permissions.
- Secret not found in Secrets Manager → Verify that the AWS Secrets Manager secret name is correct and exists in the specified AWS Region.
-
4
Step 4: Register Your ACME Account (EAB Credentials)
The next step is to register your ACME client account with the certificate authority (CA) that will issue your SSL/TLS certificate (for example, Sectigo or DigiCert).
External account binding (EAB) credentials are provided by your CA when you purchase an ACME-compatible certificate. The EAB Key ID is supplied by the CA, while the EAB HMAC key is securely retrieved from AWS Secrets Manager, as configured in the previous step.
Copy and run the following command, replacing the placeholder values with your own:
                                ~/.acme.sh/acme.sh --register-account \
                                    --server "<ACME_SERVER_URL>" \
                                --eab-kid "<EAB_KEY_ID>" \
                                    --eab-hmac-key “$EAB_HMAC_KEY"
Here’s an example of how this may look in your terminal:
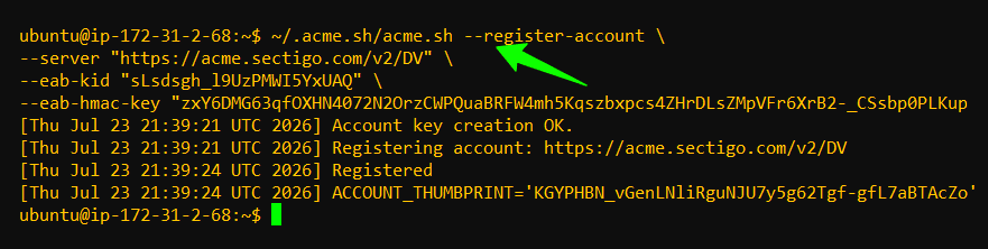 Image Caption: This example shows the ACME account was successfully registered using external account binding. If this example showed a new registration, then the CA would instead provide the personal account URL.Troubleshooting:
- externalAccountRequired → this means the EAB parameters are missing
- Invalid key → check your credentials or look for any failed registrations
-
5
Step 5: Issue Certificate (DNS Automation)
~/.acme.sh/acme.sh --issue \ --dns dns_aws \ -d "<DOMAIN_NAME>" \ --server "<ACME_SERVER_URL>" \ --keylength ec-256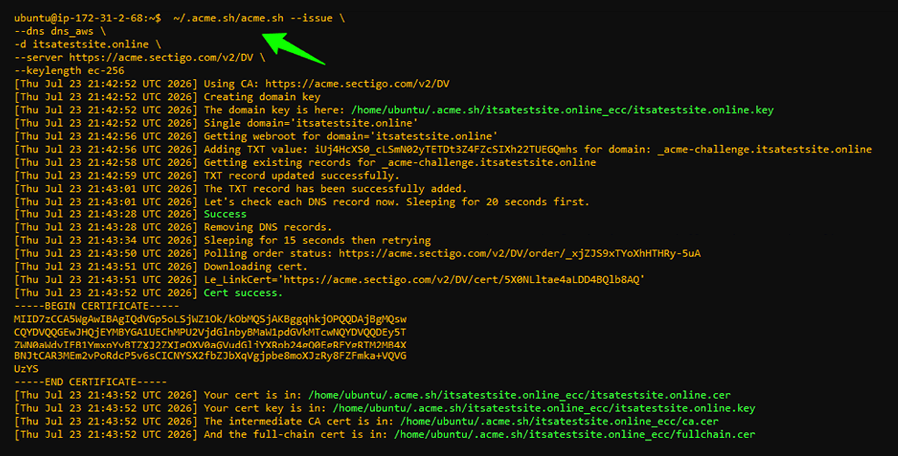 Image Caption: The certificate is issued using DNS-01 validation via Route53.What Happens Automatically:
- A TXT record is created, updated, and added
- The domain is validated
- A TXT record is removed
- The certificate is issued
Troubleshooting:- Validation failed → check Route 53 hosted zone
- Delay → wait 30–60 seconds for the DNS TXT record to propagate before retrying the validation.
-
6
Step 6: First-Time ACM Import (Required Once)
Check for existing certificates using the following command. However, ensure that AWS CLI is properly set up before running this command:
aws acm list-certificates --region "<AWS_REGION>"If no certificate(s) exist, then import the certificate manually.
However, before importing the certificate, locate the directory where acme.sh stores the issued certificate files. In the commands below, replace <CERT_DIR> with the full path to your certificate directory (for example, ///home/ubuntu/.acme.sh/<DOMAIN_NAME>_ecc).
                                    aws acm import-certificate \
                                    --certificate "fileb://<CERT_DIR>/<DOMAIN_NAME>.cer" \
                                        --private-key "fileb://<CERT_DIR>/<DOMAIN_NAME>.key" \
                                            --certificate-chain "fileb://<CERT_DIR>/ca.cer" \
                                    --region "<AWS_REGION>"
Here’s what your output should look like:
{ "CertificateArn": "<ACM_CERT_ARN>" }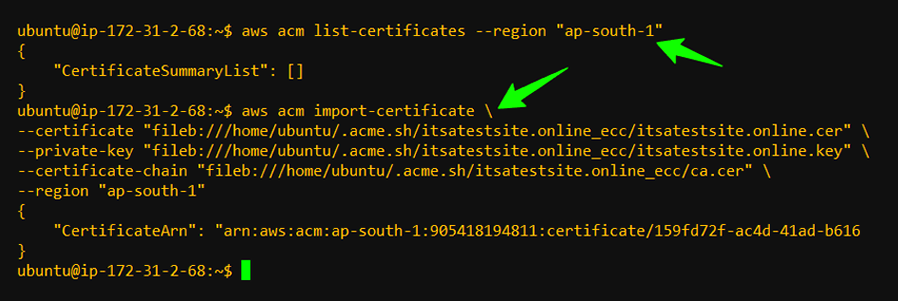 Image Caption: This example shows the successful ACM certificate import. Note the CertificateArn value in the output, as it will be used in the following steps for certificate automation.
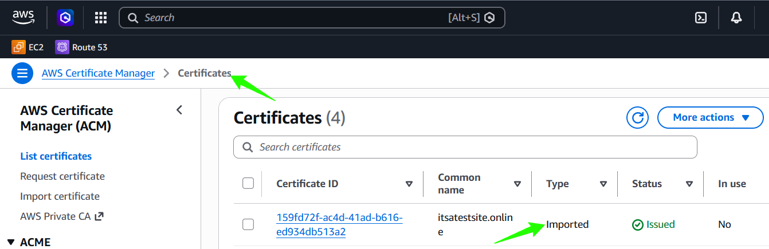 Note: This step is required only once during the initial setup to obtain the ACM Certificate ARN. The ARN will be reused for future certificate imports and automated renewals.
 -
7
Step 7: Create an Automated Import Script
Use the nano text editor to create a new script file:
nano /home/ubuntu/upload-to-acm.shThis article uses an elliptic curve cryptography (ECC) certificate by specifying the ‘--keylength ec-256’ option during certificate issuance. As a result, acme.sh stores the certificate files in a directory named <DOMAIN_NAME>_ecc. If you choose to issue an RSA certificate instead, replace <DOMAIN_NAME>_ecc with the appropriate certificate directory (for example, <DOMAIN_NAME>) in the script below.
Notes:
The examples in this article were tested on an Ubuntu EC2 instance. If you are using a different Linux distribution, replace /home/ubuntu/ with the appropriate home directory for your user account.Replace each of the following green values with your custom values:
                                    #!/bin/bash

                                    CERT_DIR="/home/ubuntu/.acme.sh/<DOMAIN_NAME>_ecc"

                                        aws acm import-certificate \
                                        --certificate-arn "<ACM_CERT_ARN>" \
                                            --certificate "fileb://$CERT_DIR/<DOMAIN_NAME>.cer" \
                                                --private-key "fileb://$CERT_DIR/<DOMAIN_NAME>.key" \
                                                    --certificate-chain "fileb://$CERT_DIR/ca.cer" \
                                                    --region "<AWS_REGION>"
To make it executable, run the following command:
chmod 700 /home/ubuntu/upload-to-acm.sh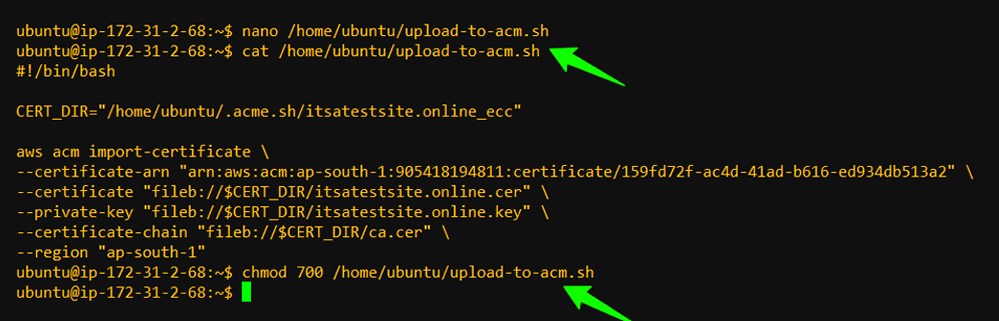 Image Caption: Script created to automatically update ACM certificateNotes:
- Ensure $CERT_DIR matches acme.sh path
- ARN must remain the same
-
8
Step 8: Attach Hook (Enable Full ACME-Based Automation)
~/.acme.sh/acme.sh --install-cert -d "<DOMAIN_NAME>" \ --key-file /home/ubuntu/cert.key \ --fullchain-file /home/ubuntu/fullchain.cer \ --reloadcmd "/home/ubuntu/upload-to-acm.sh"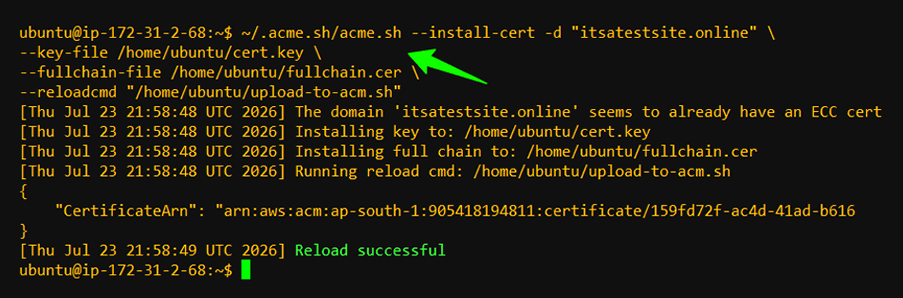 Image Caption: ACME (acme.sh) is configured with a post-renewal hook for automatic ACM updates.What This Does:
- Certificate renewal triggers a script (i.e., the hook)
- ACM is automatically updated
- ALB starts using the updated certificate
-
9
Step 9: Configure ALB Ingress (HTTPS + Redirect)
                                    apiVersion: networking.k8s.io/v1
                                    kind: Ingress
                                    metadata:
                                     name: "<INGRESS_NAME>"
                                     namespace: default
                                     annotations:
                                      alb.ingress.kubernetes.io/scheme: internet-facing
                                      alb.ingress.kubernetes.io/target-type: ip
                                      alb.ingress.kubernetes.io/listen-ports: '[{"HTTP":80},{"HTTPS":443}]'
                                      alb.ingress.kubernetes.io/certificate-arn: "<ACM_CERT_ARN>"
                                      alb.ingress.kubernetes.io/ssl-redirect: '443'

                                    spec:
                                     ingressClassName: alb
                                     rules:
                                      - host: "<DOMAIN_NAME>"
                                      http:
                                       paths:
                                        - path: /
                                        pathType: Prefix
                                        backend:
                                         service:
                                         name: "<SERVICE_NAME>"
                                         port:
                                          number: <SERVICE_PORT>
Apply the configuration to the Kubernetes cluster:kubectl apply -f ingress.yaml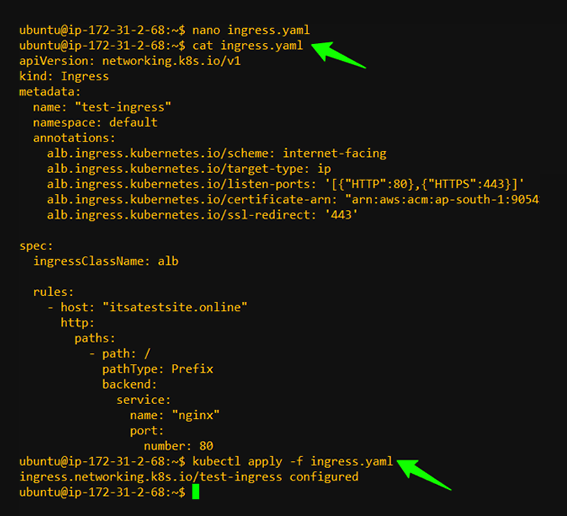 Image Caption: ALB Ingress showing HTTPS listener configuration and ACM certificate successfully attached.Notes:
- Ensure port 443 is enabled
- Certificate ARN must be valid and in the same region
Troubleshooting:- HTTPS is not working → Verify the ARN is accurate
- ALB is not updating → describe ingress (kubectl describe ingress)
-
10
Step 10: Verify HTTPS Is Enabled on Your Website
10.1 Test the Domain’s HTTP Redirect
curl -I "http://<DOMAIN_NAME>"Expected Output:
- HTTP status: 301, 302, or 308
- Redirect to HTTPS10.2 Test the Domain’s HTTPS Response
curl -I "https://<DOMAIN_NAME>"Expected Output:
- HTTP status: 200
- Successful secure response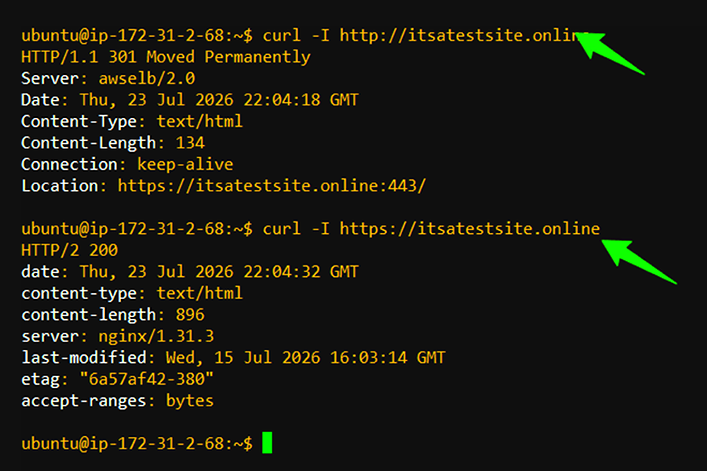 Image Caption: The HTTP to HTTPS redirection is verified and a secure HTTPS response is confirmed via ALB.
 -
11
Step 11: Ensure the Fully Automated Renewal Functionality Is Enabled
curl ~/.acme.sh/acme.sh --renew -d "<DOMAIN_NAME>" --force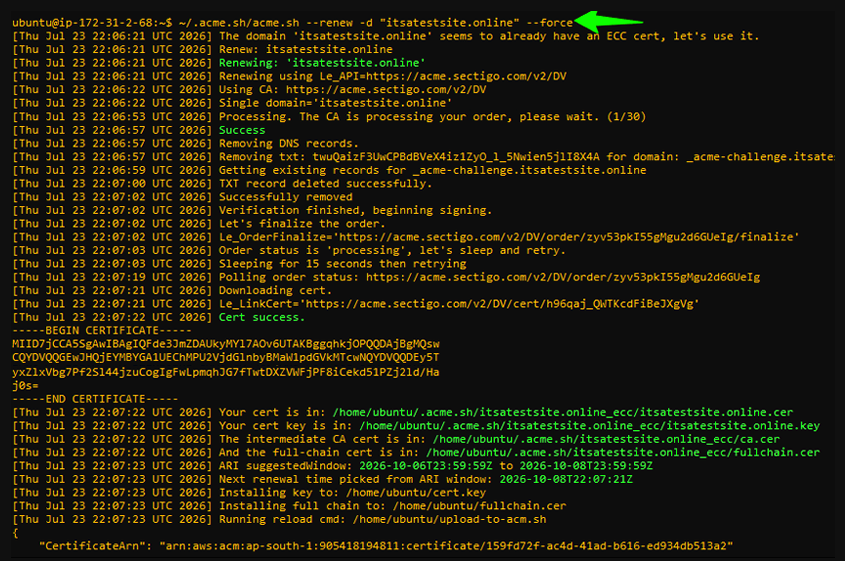 Image Caption: An example of a forced renewal, showing DNS validation, certificate issuance, and automatic ACM import via a hook.
 -
12
Step 12: Verify Which Certificate Is on File and Is Being Served
12.1 View the ACM Certificate Details
aws acm describe-certificate --certificate-arn "<ACM_CERT_ARN>"12.2 View the Live Certificate Details
echo | openssl s_client -connect "<DOMAIN_NAME>:443" 2>/dev/null | openssl x509 -noout -dates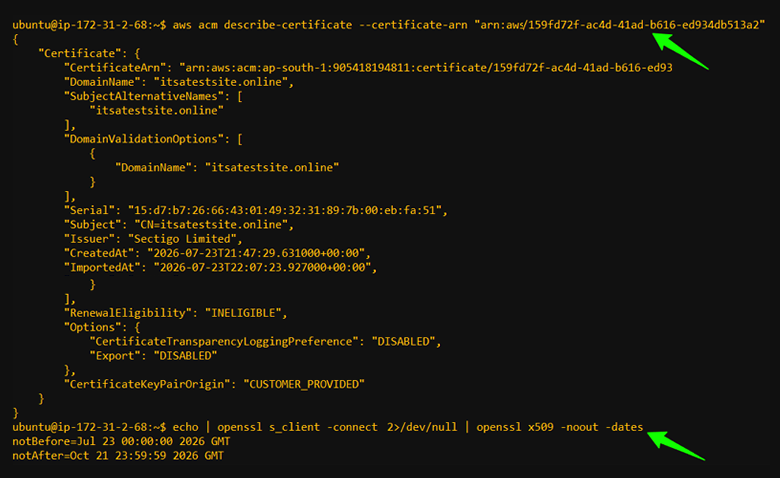 Image Caption: Live SSL certificate validation showing active validity period.
To do this, navigate to AWS Certificate Manager > Certificates and select the specific certificate to check its status and details: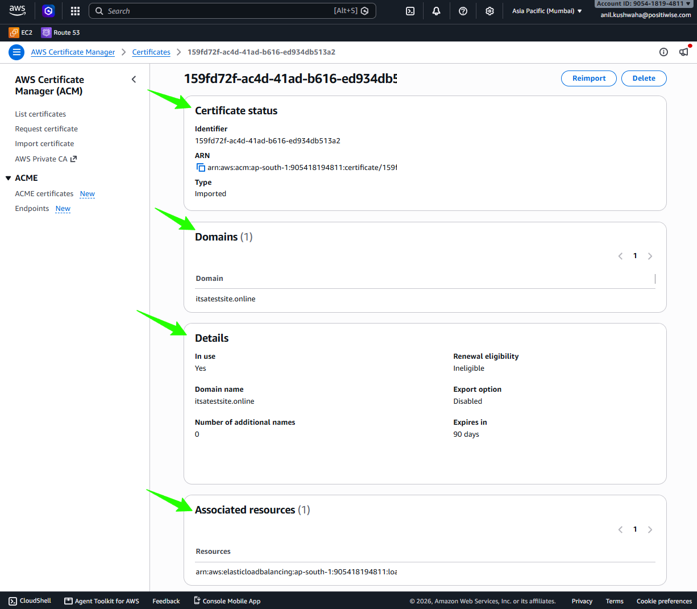 Image Caption: ACM certificate details showing ISSUED status, validity dates, and association with AWS Load Balancer Controller.
 -
13
Step 13: Enable Automatic Certificate Renewal (Cron)
13.1 Verify Cron Job
crontab -l
Expected Output (Example)
21 12 * * * "/home/ubuntu/.acme.sh"/acme.sh --cron --home "/home/ubuntu/.acme.sh" > /dev/null
Image Caption: Verified the cron configuration for acme.sh, ensuring fully automated certificate renewal without manual intervention.Notes:- acme.sh runs daily
- Renews the certificate before its expiration date
- Triggers ACM to update automatically
-
-
-
*
Final Validation
- HTTP traffic redirects to HTTPS
- TTPS endpoint returns the successful 200 response
- ACM certificate attached to ACM Certificate successfully attached to the AWS Load Balancer Controller.
- Certificate renewal process is functioning automatically
- No manual DNS intervention required during validation
-
*
Summary
You have successfully:
- Configured ACME with EAB
- Automated DNS validation using Route 53
- Integrated acme.sh with AWS ACM for certificate management
- Enabled HTTPS via the AWS Load Balancer Controller
- Implemented automatic certificate renewal with deployment hooks
- Verified a complete end-to-end SSL automation workflow
-