


How to Generate a CSR in Microsoft Exchange Server 2013 and 2016
-
Exchange Server 2013 and 2016 allow you to generate a CSR directly from the Exchange Admin Center (EAC). Follow the steps below to create a certificate request.
- Automatic renewals
- Less manual work
-
-
*
Before generating the CSR:
- Make sure you have administrative access to the Exchange Admin Center.
- Identify all public domain names that Exchange clients use to connect to your server, such as Outlook Web App (OWA) and other Exchange services.
- If your Exchange environment uses multiple domain names, choose a Multi-Domain (SAN/UCC) SSL certificate that covers all the required names.
-
*
Steps to Generate a CSR in Exchange Server 2013 and 2016
1. Sign in to the Exchange Admin Center (EAC).
2. In the left-hand navigation menu, select Servers.
3. Open the Certificates tab in the upper-right area of the page.
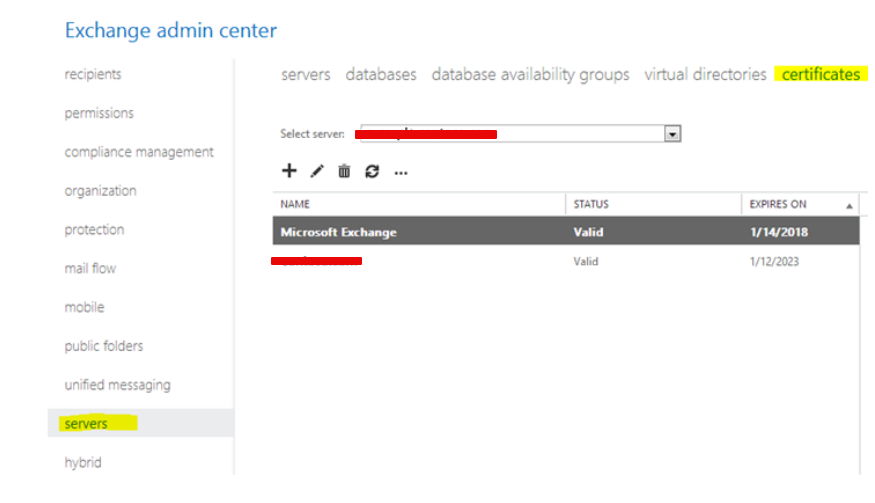
4. Click the + (Add) button to start creating a new certificate request.

5. Select Create a request for a certificate from a certification authority, then click Next.
Note: Do not select the self-signed certificate option if you need a publicly trusted SSL/TLS certificate. Self-signed certificates are not trusted by external clients by default.
6. In the Friendly name field, enter a name to identify the certificate request. Click Next.
Note: The friendly name is used for identification in Exchange and does not need to match your domain name.
7. On the next screen, leave the default settings unchanged and click Next.
8. Select the Exchange server where you want to store the certificate request, then click Next.
9. Select an Exchange service or access type, such as Outlook Web App (OWA). Click Edit (the pencil icon) and enter the domain name that clients use to access that service. Click OK.
Repeat this step for each additional service that needs to be secured. When you have configured the required services, click Next.
10. Review the Subject Alternative Names (SANs) suggested by Exchange. Select the required domain names and add any missing public domain names used by your Exchange clients. Click Next.
Note: Do not include NetBIOS names, IP addresses, or internal domain names ending in .local in a public SSL/TLS certificate request. Make sure that all required public domain names are included in the CSR and in your certificate order.
11. Enter your organization's details:
- Organization name: Your company's legal name.
- Department name: The department responsible for the server, if applicable.
- Country/Region: Select your organization's country.
- City/Locality: Enter the city where your organization is registered.
- State/Province: Enter the state or province where your organization is registered.
Click Next.
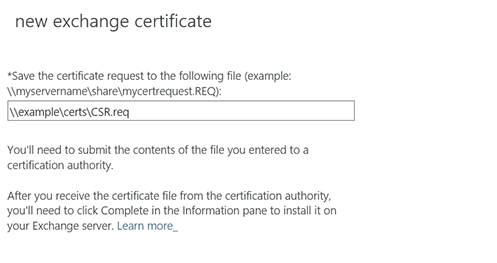
12. Specify the file path where you want to save the certificate request. Choose a location on the server and complete the wizard.
-
*
Submit the CSR to the Certificate Authority
Your CSR has now been generated.
Open the saved CSR file using a text editor, such as Notepad, and copy the complete contents. Make sure to include the -----BEGIN CERTIFICATE REQUEST----- and -----END CERTIFICATE REQUEST----- lines.
Paste the CSR into the corresponding field when ordering your SSL/TLS certificate.
Note: Exchange generates the private key associated with the CSR during this process. Keep the private key on the server and do not send it to the Certificate Authority. You will need the corresponding private key when installing the issued certificate.
-
